The Basics of Exploit Development 2: SEH Overflows
Introduction
In this article we will be writing an exploit for a 32-bit Windows application vulnerable to Structured Exception Handler (SEH) overflows. While this type of exploit has been around for a long time, it is still applicable to modern systems.
Setup
This guide was written to run on a fresh install of Windows 10 Pro (either 32-bit or 64-bit should be fine) and, as such, you should follow along inside a Windows 10 virtual machine. This vulnerability has also been tested on Windows 7, however the offsets are the ones from the Windows 10 machine referenced in this article. The steps to recreate the exploit are exactly the same.
We will need a copy of X64dbg which you can download from the official website and a copy of the ERC plugin for X64dbg from here.Because the vulnerable application we will be working with is a 32-bit application, you will need to download either the 32-bit version of the plugin binaries or compile the plugin manually. Instructions for installing the plugin can be found on the Coalfire GitHub page.
If using Windows 7 and X64dbg with the plugin installed crashes and exits when starting, you may need to install .Net Framework 4.7.2, which can be downloaded here.
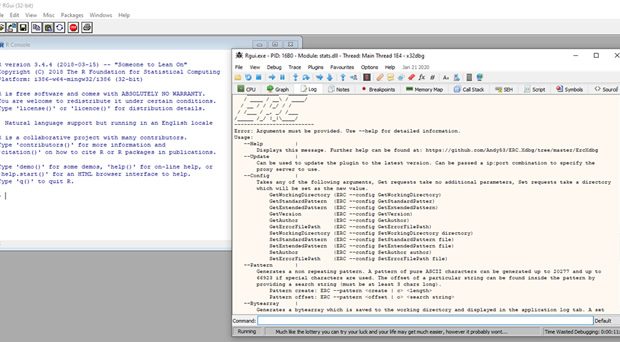
Finally, we will need a copy of the vulnerable application (R.3.4.4), which can be found here. In order to confirm everything is working, start X64dbg and select File -> Open, then navigate to where you installed R.3.4.4 and select the executable. Click through the breakpoints (there are many breakpoints to click through) and the R.3.4.4 GUI interface should pop up. Now in X64dbg’s terminal type:
Command:
ERC –help
You should see the following output:
What is a Structured Exception Handler (SEH)?
An exception handler is a programming construct used to provide a structured way of handling both system- and application-level error conditions. Commonly they will look something like the code sample below:

Windows supplies a default exception handler for when an application has no exception handlers applicable to the associated error condition. When the Windows exception handler is called, the application will close and an error message similar to the one in the image below will be displayed:

Exception handlers are stored in the format of a linked list with the final element being the Windows default exception handler. This is represented by a pointer with the value 0xFFFFFFFF. Elements in the SEH chain prior to the Windows default exception handler are the exception handlers defined by the application.
Each element in the SEH chain (an SEH record) is 8 bytes in length consisting of two 4-byte pointers. The first points to the next SEH record and the second one points to the current SEH records exception handler:

When an exception occurs, the operating system will traverse the SEH chain to find a suitable exception handler to handle the exception. The values from this handler will then be pushed onto the stack at ESP+8.
Each process contains a Thread Environment Block (TEB), which can be useful to exploit developers and is pointed to by FS:[0].
The TEB contains information such as the following:
- First element in the SEH list is located at FS:[0x00].
- Address of the PEB (which contains a list of modules loaded by the application).
- Address of the Thread Local Storage (TLS) array.
An image representation of the SEH chain can be seen below:

If you would like to view a collection of exception handlers under normal conditions, compile the code below into an executable using Visual Studio and then run it using X64dbg:

When navigating to the SEH tab you should see a number of exception handler records consisting of two 4-byte sequences each:

Confirming the Exploit Exists
Confirming that the application is vulnerable to an SEH overflow requires us to pass a malicious input to the program and cause a crash. In order to create the malicious input, we will use the following Python program, which creates a file containing 3000 A’s:

Copy the contents of the file and move to the R.3.4.4 application, click Edit -> GUI preferences (if you are running Windows 10 at this point you will need to switch back to X64dbg and click through two more break points), then in the “GUI Preferences” window, paste the file contents into “Language for menus,” then click “OK.” A message box will appear giving an error message. Click through this and then switch back to X64dbg to examine the crash.

As in the first part in this series (The Basics of Exploit Development 1: Win32 Buffer Overflows), the EIP register has been overwritten, indicating this application is also vulnerable to a standard buffer overflow (you can write an exploit for this type of vulnerability as well using this application if you wish). In this article, however, we are doing an SEH overflow and, if we navigate to X64dgb’s SEH tab, we can see that the first SEH record has been overwritten.

At this point we have confirmed that the application is vulnerable to an SEH overwrite and we can continue to write our exploit code.
How an SEH Overflow Works
In order to exploit an SEH overflow, we need to overwrite both parts of the SEH record. As you can see from the diagram above, an SEH record has two parts: a pointer to the next SEH record and a pointer to the current SEH records exception handler. As such, when you overwrite the pointer to the current exception handler, you have to overwrite the pointer to the next exception handler as well because the pointer to the next exception handler sits directly before the pointer to the current exception handler on the stack.
When an exception occurs, the application will go to the current SEH record and execute the handler. As such, when we overwrite the handler, we need to put a pointer to something that will take us to our shell code.
This is done by executing a POP, POP, RET instruction set. What this set does is POP 8 bytes off the top of the stack and then a returns execution to the top of the stack (POP 4 bytes off the stack, POP 4 bytes off the stack, RET execution to the top of the stack). This leaves the pointer to the next SEH record at the top of the stack.
As discussed earlier, if we overwrite an SEH handler we must overwrite the pointer to the next SEH record. Then, if we overwrite the next SEH record with a short jump instruction and some NOPs, we can jump over the SEH record on the stack and land in our payload buffer.
Developing the Exploit
Now that we know we can overwrite the SEH record, we can start building a working exploit. As was the case in the previous episode of this series, we will be using the ERC plugin for X64dbg. So, let’s ensure we have all our files being generated in the correct place with the following commands:
Command:
ERC --config SetWorkingDirectory C:UsersYourUserNameDirectoryYouWillBeWorkingFrom

If you are not using the same machine as last time, you may want to reassign the project author.
Command:
ERC –config SetAuthor AuthorsName

Now that we have assigned our working directory and set an author for the project, the next task is to identify how far into our string of A’s that the SEH record was overwritten. To identify this, we will generate a non-repeating pattern (NRP) and include it in our next buffer.
Command:
ERC --pattern c 3000

We can add this into our exploit code, so it looks like the following:

Run the Python program and copy the output into the copy buffer and pass it into the application again. It should cause a crash. Run the following command to find out how far into the pattern the SEH handler was overwritten:
Command:
ERC --FindNRP
The output should look like the following image. The output below indicates that the application is also vulnerable to a standard buffer overflow as was noted earlier:

The output of FindNRP indicates that after 1008 characters the SEH record was overwritten (this will be ~900 if you are on Windows 7). We will now test this by filling both the SEH handler pointer and next SEH record pointer with specific characters.

After providing the output to the application, the SEH tab should show the following results:

Identifying Bad Characters
In the previous installment of this series we covered identifying bad characters. You can review that here if you need to. The process for this exploit, however, is exactly the same and we will not be covering it in this installment. The bad characters for this input are “x00x0Ax0D”.
Now that we have control over the SEH record, we need to find a pointer to a POP, POP, RET instruction set. We can do this with the following command:
Command:
ERC –SEH

When choosing our instruction, we need to choose one that is not from a module with ASLR, DEP, Rebase, or SafeSEH enabled, and for portability purposes preferably not an OS DLL, either. Ideally, we want one from a DLL associated with the application.

I chose the above pointer to use. You can choose any that fit the requirements listed above. Once a pointer has been chosen, insert it over the “C’s” in the exploit code so it looks something like this:

Then place a break point at 0x637412C8, create a new payload, and pass it to the application again. You should land at your breakpoint. Single step through the POP, POP, RET instruction and return to your “B’s.”

Now we need to change the “B’s” for a short jump, to jump over our SEH record overwrite and land in our payload buffer. In order to do this we need to generate a short jump instruction and build it into our payload.
Command:
ERC –Assemble jmp 0013

Now that we have our short jump command and our pointer to a POP, POP, RET instruction set, we can modify our exploit to land us in our buffer of “C’s.”

Notice we have added to NOPs to our short jump in order to make it a full 4 bytes. Now when we generate our payload and pass it to the application again, we should wind up landing in our buffer of “C’s.”

Now that we can redirect execution into an area of memory we control, we can start crafting our payload. Initially we will replace our “C’s” with NOPs and we will use MSFVenom to create our payload:

Command:
msfvemon -a x86 -p windows/exec CMD=calc.exe -b ‘x00x0Ax0D’ -f python
As in the last article, we will add a small NOP sled to the start of our payload in order to add some stability to our exploit. After the NOP sled, we append our payload, making the final exploit code look something like the following:

Passing the string into the application causes the application to exit and the Windows calc.exe application to run:

Conclusion
Preventing SEH exploits in most applications can be achieved by specifying the /SAFESEH compiler switch. When /SAFESEH is specified, the linker will also produce a table of the image's safe exception handlers. This table specifies for the operating system which exception handlers are valid for the image, removing the ability to overwrite them with arbitrary values.
64-bit applications are not vulnerable to SEH exploits. By default, they build a list of valid exception handlers and store it in the file’s PE header. As such, this switch is not necessary for 64-bit applications. Further information can be found on the MSDN.
In this article we have covered how to exploit a 32-bit Windows SEH overflow using X64dbg and ERC. Then we generated a payload with MSFVenom and added it to our exploit to demonstrate code execution. While SEH overflows are not a new technique, they are still very relevant today.


Gloss