
Caddy offers TLS, HTTPS, and more in one dependency-free Go Web server
Yesterday, the Caddy Web server reached an important milestone, with its 2.0.0 release. Caddy bills itself as "The Ultimate Server," with no dependencies, automatic TLS certificate obtainment and renewal, and much smaller configuration files than Apache or Nginx.
Senior Technology Editor Lee Hutchinson expressed both curiosity about Caddy and his own personal inertia in the Ars slack:
Caddy is an app where every time i see it or think of it i say “I should mess with it, it looks neat” and then I never do. I’ve gotten so enmeshed in my haproxy - varnish - nginx stack that breaking out feels like more trouble than it’s worth.
I hadn't ever heard of Caddy until Lee mentioned it, but I know a call to action when I hear one.
Baby's first (mis)steps with Caddy
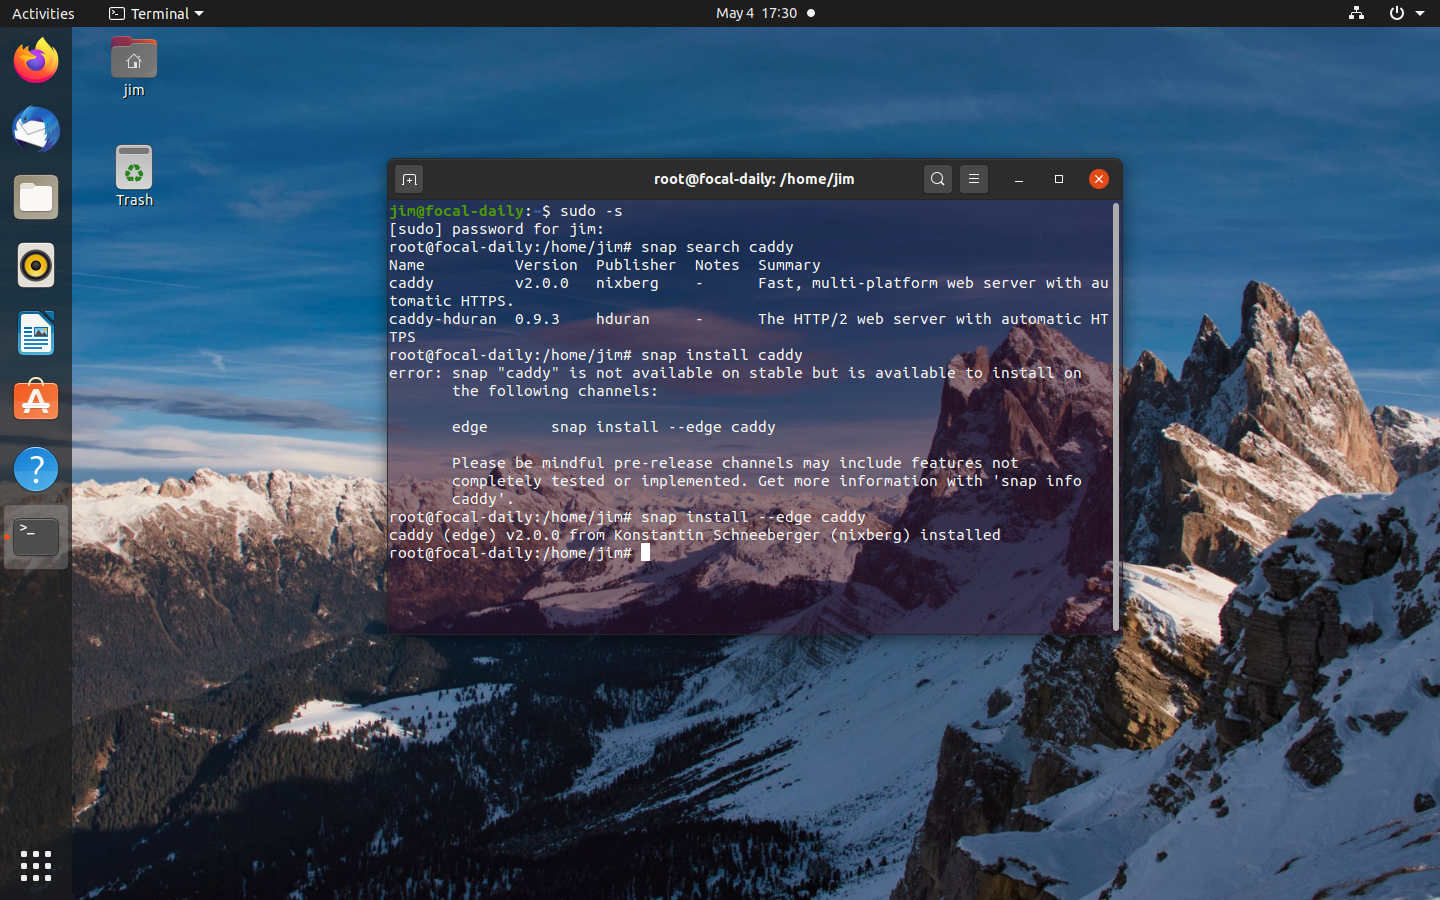
After watching a short animation demonstrating rapid deployment of Caddy, I dove right into the linked HTTPS quick-start docs. This turned out not to be the best way to experience Caddy for the first time, to put it mildly. The quick-start tutorial glossed over the actual installation of Caddy, and I'd already left the Github release page—so my next thought was to look for Caddy in the usual places, on a fresh Ubuntu 20.04 VM.
When apt search caddy came up empty, I tried snap search caddy instead—and, bingo:
Jim Salter
Not only was caddy available in the Ubuntu snap repositories, it was 2.0.0—the version that was just released! So I did a snap install caddy, and I was off to the races. Unfortunately, I wasn't off to the races in a good way. The caddy snap didn't just install caddy, it also started it as a service—somewhere—which I discovered when I attempted to follow the quick-start's directive to run caddy start in any random directory where I'd created a file named Caddyfile.
Although it was possible to make Caddy do my bidding from this snap, I never did figure out where the snap kept Caddy's configs—so the only way I could get it to work was to snap stop caddy, ps wwaux | grep caddy | grep -v grep to make sure the snap didn't still have a process running sneakily (which it sometimes did) and kill it if so, then run it manually.
To be fair, the quick-start docs seemed to make out running caddy manually to be a good thing—and several of the top results I found when googling "install caddy" instructed me to pipe curl https://getcaddy.com/ directly to sudo bash -s personal.
As a sysadmin, not developer—and a particularly security-aware sysadmin—I had a pretty violent reaction to that advice. It still makes my eyelid twitch just looking at that. Please, folks—do not just pipe the Internet directly into your system's brain, complete with root privileges.
Installing Caddy the right way
-
In addition to .deb files available directly from the Github release page, Caddy offers its own third-party apt repository (and similar resources for non-Debian-based distributions).
Jim Salter -
With the stock Caddyfile, Caddy only services requests on port 80—but its default behavior also includes mandatory redirection to HTTPS, so all you see in a browser is "Unable to connect."
Jim Salter -
For dev purposes, you can get Caddy running by replacing ":80" with "localhost" in your Caddyfile. This gets you a snake oil certificate—and security warnings in your browser.
Jim Salter -
Firefox is deeply unhappy about Caddy Local Authority - ECC Intermediate, whether the rest of the system trusts it or not.
Jim Salter -
Oh hey, look—it's a default webpage! Unfortunately, you really need the helpful instructions it contains well before you get to the point where you can actually see them here.
Jim Salter
Fortunately, there are much saner paths to happy Caddy-ing. There are native packages for several distributions and architectures available at the Github release page, and that's how I installed Caddy next—but if you steer clear of search engines and restrict yourself to Caddy's own install document, there is an even better path; they maintain their own apt repository.
When Caddy is installed either directly from a .deb at the Github release, or from the repository at apt.fury.io, you get a functional, integrated Web server that's ready to go—well, mostly, anyway. The default Caddyfile runs the server on localhost:80, but its default behavior also includes a mandatory HTTPS redirect—so all you'll see in a browser is "Unable to connect."
Updating the host line in your Caddyfile from :80 to localhost and then doing caddy reload gets you an automatic snake oil certificate issued. It looks like Caddy also attempted to add the new snake oil certificate to my Ubuntu VM's certificate trust store—but Firefox certainly didn't trust it, and we're presented with trust errors and dire warnings.
These can at least be clicked through, and finally we have proof of function: a strangely slanted default webpage. That default webpage tells us something that should be obvious now: all of this would really work much better if we had a real domain to play with. Caddy doesn't just default to HTTPS/TLS available, it really doesn't want anything to do with you without TLS—and that means a real, publicly resolvable domain.
Zero to WordPress—eventually
-
We're looking at WordPress installs on two Ubuntu 20.04 droplets at Digital Ocean—Caddy on the left, Apache on the right.
Jim Salter -
Our Caddy droplet had a redirect loop problem with wp-admin—this turned out to be due to an odd directive in the sample Caddyfile used in the docs.
Jim Salter -
Commenting out a line in the sample Caddyfile turned out to be all that was needed to resolve the redirect loop in wp-admin.
Jim Salter
Now that I knew I could get Caddy working at all, it was time to get it working for real—or at least, "real" enough to write an article about. A simple "hello world" static webpage wasn't enough of a test—and since WordPress powers roughly 36% of the websites on the planet, it looked like a great place to start.
I also wanted to do a head-to-head comparison with a more traditional Web server, since my first exposure to Caddy was its claims of being simple, fun, and much easier to configure. Frankly, I was a little dubious of the last claim—much of the time, when a developer tells you something is "easy to configure" they really should just be telling you "I know all the pitfalls here very well."
Jim Salter
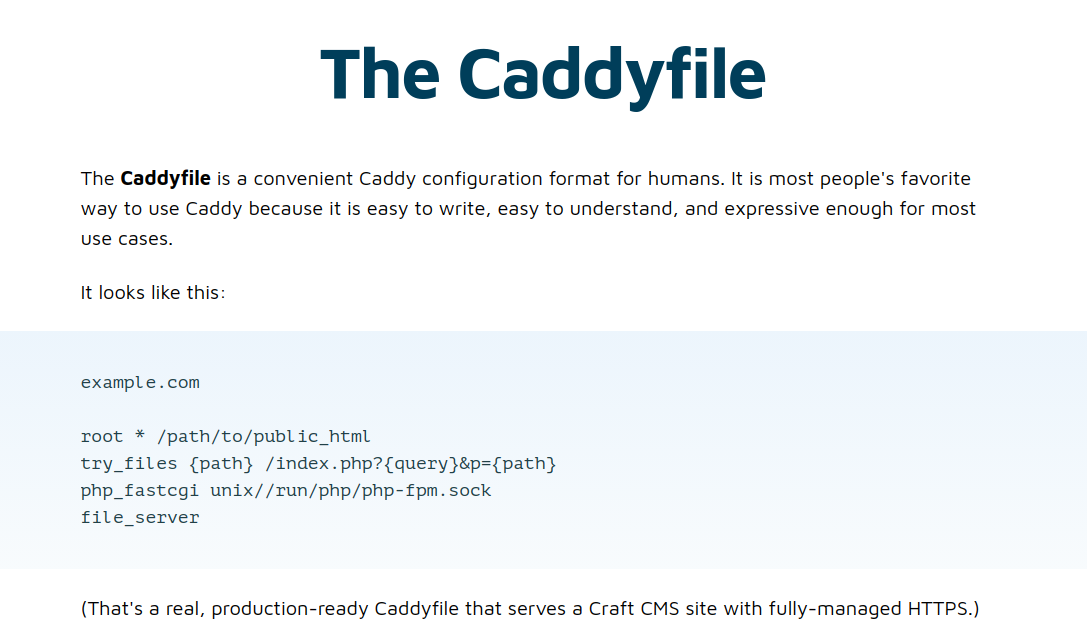
One such pitfall is the sample Caddyfile presented at https://caddyserver.com/docs/caddyfile. The tutorial proudly tells you "that's a real, production-ready Caddyfile that serves a Craft CMS site with fully managed HTTPS." What it doesn't tell you is that one of the directives in that simple file will break most sites that aren't the Craft CMS. The try_files directive shown overrides the try_files directive implicit in the fastcgi directive itself, and it caused a nasty redirect loop in the WordPress dashboard once I got it up and running.
Caddy 2.0.0 vs Apache 2.4.41—installation fight!
I had two major questions about Caddy 2.0.0—was it really easier to configure than a more conventional Web server, and how well would it perform? If this was a boxing match, Caddy was clearly the contender—and I chose Apache to serve as the reigning champion for it to challenge.
I spun up two new Digital Ocean droplets running Ubuntu 20.04, and set up WordPress from scratch on each of them—one running Caddy 2.0.0 from its third-party repository, and one running Apache 2.4 straight from the Ubuntu Focal Fossa repos.
The usual buzz is that Apache is old and slow compared to the other common web service heavyweight, Nginx. Most of this reputation is undeserved—Apache has been around forever, and guide after guide after guide advise users to configure it poorly. Yes, if you configure Apache to use the antediluvian mod_php module, performance as an application server will suck—this forces Apache to use the prefork MPM.
If you don't force Apache into using prefork, under modern Ubuntu it defaults instead to the event multi-processing module, which is far lighter-weight. Under prefork and mod_php, Apache and PHP are run as one gigantic hybrid process, which is extremely wasteful of RAM and processing power when serving static files such as CSS, images, or pure HTML.
When you avoid mod_php and use event with php-fpm instead, Apache changes from a sluggish beast into a real contender that can go toe-to-toe with nginx.
Common pre-installation steps
There's a lot of installation necessary to get a working WordPress instance up that doesn't have anything specifically to do with either Apache or Caddy. I'm going to list those necessary steps here, which were identical for both Web servers as (eventually) configured.
root@droplet:~# apt update ; apt install mysql-server php-fpm php-common php-mbstring php-xmlrpc php-soap php-gd php-xml php-intl php-mysql php-cli php-ldap php-zip php-curl
root@droplet:~# grep pass /etc/mysql/debian.cnf
First, we install the MySQL database server, the PHP fast process manager, and a whole string of PHP extensions that WordPress will need to run properly. Then we get the maintenance user's password from /etc/mysql/debian.cnf, so that we can install a database for our WordPress instance to use.
root@droplet:~# mysql -u debian-sys-maint -p
mysql> create database wordpress;
mysql> create user 'wordpress'@'localhost' identified by 'supersecretpassword';
mysql> grant all on *.* to 'wordpress'@'localhost';
This was actually a bit of a head-scratcher—the MySQL syntax for granting privileges on a database changed with MySQL 8.0, which is now the default in Ubuntu Focal. The syntax shown above is correct!
The other step you need is a domain to play with, and working DNS that actually points to your server. I used new hostnames at one of my own domains, and just updated my BIND zone file to add them. For someone with less existing infrastructure, it's easier to use the provided DNS at a registrar such as Namecheap.
However you handle it, you're going to need a publicly accessible IP address, reachable on both ports 80 and 443—and you're going to need public, resolvable DNS to point to it. Detailing that is unfortunately out of scope here.
Installing and configuring Apache 2.4
Apache, unsurprisingly, is right there in Ubuntu 20.04's main apt repository. Installation is as straight-forward as it can be, with minimal reconfiguration necessary to get things working.
root@droplet:~# apt install apache2 python3-certbot-apache
root@droplet:~# a2enmod proxy_fcgi
root@droplet:~# a2enconf php7.4-fpm
root@droplet:~# sed 's/#ServerName www.example.com/yourdomain.com/' /etc/apache2/sites-enabled/000-default.conf
root@droplet:~# systemctl restart apache2
root@droplet:~# certbot
If that sed command is making you nervous, don't let it—that's just a bit of shorthand to let me get away without putting a nano in the middle of the workflow. All the sed command is doing is finding the commented-out line in the default vhost config file which would set the ServerName directive, and replacing it with a real directive to use our working DNS hostname.
This is it for the Apache-specific configs—with this done, we skip to the post-installation, and we've got a working WordPress!
Installing and configuring Caddy 2.0.0
I didn't really find getting Caddy going any easier than I had getting Apache going. Granted, I've technically got more than 20 years of Apache experience—but this wasn't my first trip to the new-software-for-the-same-purpose rodeo, either.
I'm skipping most of the fumbling-toward-goal trial and error I slogged through on the way to finally getting a working Caddy configuration, in the interests of making this comparison as fair to Caddy as possible despite my much greater experience with Apache.
root@caddytest:~# echo "deb [trusted=yes] https://apt.fury.io/caddy/ /" > /etc/apt/sources.list.d/caddy-fury.list
root@caddytest:~# apt update
root@caddytest:~# apt install caddy
At this point, I need to break from the workflow I had with Apache—there's no option as simple as just uncommenting a line in the default config; I needed to start over with a new Caddyfile. I used the example Caddyfile provided at caddyserver.com—but with the unfortunate noob trap edited out.
root@caddytest:~# cat /etc/caddy/Caddyfile

yourdomain.com
root * /var/www/html

# this wasn't in the sample Caddyfile—
# and without it, Caddy gets no logging at all!
#
log {
output file /var/log/caddy/access.log
format console
}

# this is the noob trap that caused a wp-admin redirect loop
#try_files {path} /index.php?{query}&p={path}

php_fastcgi unix//run/php/php-fpm.sock
file_server
So far, so good—but the ownership of the php-fpm pool also needs to be changed. By default, it's owned by the www-data user—but Caddy runs as caddy, not www-data. Without updating that permission, Caddy won't be allowed to access the unix socket php-fpm is operating from.
We could also work around this by running php-fpm over a TCP socket on localhost—but that would also require more configuration, and would result in a lower-performance stack.
root@caddytest:~# sed -i 's/www-data/caddy/g' /etc/php/7.4/fpm/pool.d/www.conf
root@caddytest:~$ systemctl restart php7.4-fpm
root@caddytest:~$ systemctl restart caddy
I needed a much deeper knowledge of the php-fpm stack to get things working here than I did with Apache. There was also no working logging in the sample Caddyfile provided—and a noob trap in that sample which enables a highly unusual setup (Craft CMS, with a 0.2% CMS marketshare), while breaking most setups, including the most common one on the planet (WordPress, with a 63.3% CMS marketshare).
I'm well aware that I have a lot more experience with Apache than Caddy, but I don't see how Caddy can reasonably be granted an ease-of-use win here.
Common post-installation steps
We also need to download WordPress itself, unpack it, and put it in the directory where it will be served.
root@droplet:~# mkdir -p /var/www
root@droplet:~# cd /var/www/
root@droplet:/var/www# wget https://wordpress.org/latest.tar.gz
root@droplet:/var/www# mv html html-dist ; mv wordpress html
root@droplet:/var/www# chown -R $webserveruser html
Okay, we had to fudge things a little in this step: Apache doesn't actually need you to create the /var/www directory, and Caddy doesn't need you to mv html html-dist, since it didn't have a directory in /var/www to start with. But in the interest of getting common things out of the way, we're going to call this one a draw.
If some poor soul is trying to use this as a guide to getting WordPress working, I should also point out that $webserveruser isn't literal, here—for Apache, it's www-data, and for Caddy, it's caddy.
Once this is done, you're ready to point the nearest browser to https://yourdomain.com/ and walk through the WordPress installation.
Caddy 2.0.0 vs Apache 2.4.41—performance fight!
Once WordPress was installed and fully operational on both droplets, it was time to for a performance test. I used the venerable apachebench tool running on localhost on each droplet for the testing; this was provided along with Apache itself on the Apache droplet, and provided with apt install apache2-utils on the Caddy droplet.
The short version here is that Caddy wins. With a simple ab -c5 -t10 https://yourdomain.com/ running against a default, virgin WordPress with the single Hello World post, Apache pulls 37.8 requests per second to Caddy's 42.4. Caddy also delivered slightly faster median requests, at 114ms to Apache's 129ms, and faster 99th percentile requests at 182ms to Apache's 184ms.
With that said, this is a pretty silly, artificial benchmark that isn't much use aside from giving us a reasonable overall idea of Web server performance. A real-world WordPress site tuned to survive a Slashdotting (Arsdotting?) is going to need a lot of configuration and tuning beyond what we did here—we need more php-fpm workers available, we need to install a WordPress performance plugin such as W3-Total-Cache installed, and we need to configure that performance plugin to cache objects, files, queries, and more.
On the Apache side, that means installing php-apc at a minimum, preferably memcached to go along with it, and configuring both of those. I'll readily admit I'm not certain whether either or both of those are necessary for Caddy—I see one of the gears in a promo graphic for it labeled "Caching," but it's not entirely clear what Caddy's native capabilities here entail. I found documents for an optional cache plugin for Caddy 1.x, but this doesn't appear to be applicable to 2.0.0.
If you really need to get the most performance possible out of a web stack, you're going to veer rapidly from Caddy's initial promise of "easy, fun setup" and get into the sysadmin's usual grind of determination and thoroughness, no matter your platform. Your results are also likely to differ strongly from one workload to another—"fastest" for WordPress and "fastest" for Craft or something else may be very different answers.
Conclusions
Caddy is a capable Web server that seems to be headed in good directions with the 2.0.0 release. The earlier version's installation advice to just pipe curl to sudo bash made me grind my teeth, but it appears that the project has matured considerably and is going for much saner, healthier recommended configurations now.
It also performs quite well, eking out a small but measurable win against Apache 2.4.41 running the mpm_event model. This puts it in the same general performance ballpark as nginx. When properly configured, Apache, nginx, and Caddy will all perform reasonably similarly—so if Caddy's general style and design float your boat, it appears to be a solid choice.
On the other hand, it's difficult to beat the decades of experience and flexibility that Apache's configuration design brings to the table. If all you're worried about is one or two sites, you may not see much difference between configuring Caddy or Apache. But if you're routinely managing tens—or hundreds—of sites, Apache's ability to cleanly separate virtual-host specific configs in their own individual files might start looking pretty indispensable.
The good
- Built-in everything with no dependencies makes Caddy simple to install, and simple to upgrade, even outside traditional package management systems
- World-class performance as compared to Apache 2.4.41 (event MPM) and, by extension, Nginx
- Caddy has its own apt repos for Debian-based distributions
- Lack of dependencies make Caddy extremely portable between distributions, with no potential library conflicts in binary builds
- Short, if occasionally somewhat arcane config files
The bad
- Documentation can be a bit rough—sample files aren't entirely workable for standard usecases, are missing functionality, etc
- Conflicts between v2.0 and v1.x configuration syntax—they're almost entirely incompatible, and it's easy to accidentally end up on a 1.x doc if you're Googling for answers
- "Docs" and "tutorials" often seem to conflict—some focus on cowboy-style running from the CLI, others on more sane, traditional system-oriented configuration
The ugly
- HTTPS-only means snake oil certs and security warnings if you're in an environment with no public IP and/or no working DNS
- Very low "Web server marketshare"—less than 0.1%, according to w3techs—means you're very much on the path less traveled
- No distribution package management—you're relying directly on the project itself for all QA and security


Gloss